Twitterのタイムラインみたいなリストを作ってみる。バインディングのあたりはは、[UWP] Hello World的なものに詳しく書いてあるのでこちらも参考にしてくれ。

・空白のUWPを新規作成する
・プロジェクトにImagesフォルダを作ってアカウントのアイコンの代わりになるimage.pngを追加する。
・データのクラスを作る。
using System;
using System.Collections.Generic;
using System.Linq;
using System.Text;
using System.Threading.Tasks;
using Windows.UI.Xaml.Media.Imaging;

namespace TestCustomList2
{
    class Article
    {
        public String User { get; set; }
        public String Comment { get; set; }
        public BitmapImage Image { get; set; }

        public Article(BitmapImage image, String user, String comment)
        {
            User = user;
            Comment = comment;
            Image = image;
        }
    }
}
・MVVMのViewModelにあたるクラス(MainPageViewModel)を作る。
using System;
using System.Collections.Generic;
using System.Collections.ObjectModel;
using System.ComponentModel;
using System.Linq;
using System.Runtime.CompilerServices;
using System.Text;
using System.Threading.Tasks;
using Windows.UI.Xaml.Media.Imaging;

namespace TestCustomList2
{
    class MainPageViewModel : INotifyPropertyChanged
    {
        public event PropertyChangedEventHandler PropertyChanged;

        public MainPageViewModel()
        {
            list = new ObservableCollection<Article>();

            BitmapImage img = new BitmapImage(new Uri("ms-appx:///Images/image.png"));
            list.Add(new Article(img, "user1", "あいうえお"));
            list.Add(new Article(img, "user1", "あいうえおあいうえおあいうえおあいうえおあいうえおあいうえおあいうえおあいうえおあいうえお"));
        }

        private void NotifyPropertyChanged([CallerMemberName]string propertyName = null)
        {
            var handler = PropertyChanged;
            if (handler != null)
            {
                handler(this, new PropertyChangedEventArgs(propertyName));
            }
        }

        public ObservableCollection<Article> list { get; set; }
    }
}
・画面をデザインする。MainView.xamlを開いてListViewを貼る。
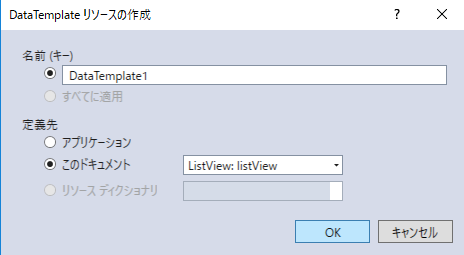
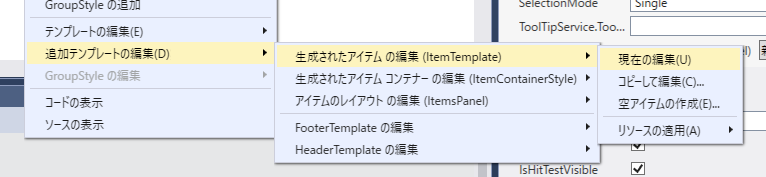
・貼ったListViewを右クリックして、追加テンプレートの編集 - 生成されたアイテムの編集(ItemTemplate) - 空アイテムの作成を選ぶ。

・定義先でlistViewを選ぶ。
・DataTemplateのGridを2×2にする。
・グリッドの0カラムの0〜1行にImageを追加してとりあえずSourceプロパティでImages/image.pngを選ぶ。ImageのWidthを64にする。Marginを10にする。
・Gridの0カラムのWidthをAuto、0、1ローのHeightをAutoにする。
・ユーザー名を表示するTextBlockを1カラム0ローに追加する。Marginを10にする。フォントサイズを20px、太字にする。
・コメントを表示するTextBlockを1カラム1ローに追加する。Marginを10にする。

・一度ビルドしておく。
・View Modelと接続していく。デザイナーでPageを選択して、メニューから書式 - デザイン時のDataContextの設定を選ぶ。表示されるダイアログでDataContextの種類でDesignInstance、TypeでMainPageViewModelを選ぶ。IsDesignTimeCreatableをチェックする。
・ListViewのItemsSourceのデータバインディング作成でlistプロパティと接続する。
・デザイナーで貼り付けているListViewで右クリックして、追加テンプレートの編集 - 生成されたアイテムの編集 - 現在の編集を選ぶ。
・貼ってあるImageのSourceをImageと接続する。
・貼ってあるユーザー名のTextBlockのTextをUserと接続する。
・貼ってあるコメントのTextBlockのTextをCommentと接続する。
・MainPageクラスでMainPageViewModelのインスタンスを作成してDataContextに設定する。
using System;
using System.Collections.Generic;
using System.IO;
using System.Linq;
using System.Runtime.InteropServices.WindowsRuntime;
using Windows.Foundation;
using Windows.Foundation.Collections;
using Windows.UI.Xaml;
using Windows.UI.Xaml.Controls;
using Windows.UI.Xaml.Controls.Primitives;
using Windows.UI.Xaml.Data;
using Windows.UI.Xaml.Input;
using Windows.UI.Xaml.Media;
using Windows.UI.Xaml.Navigation;

// 空白ページのアイテム テンプレートについては、http://go.microsoft.com/fwlink/?LinkId=402352&clcid=0x409 を参照してください

namespace TestCustomList2
{
    /// <summary>
    /// それ自体で使用できる空白ページまたはフレーム内に移動できる空白ページ。
    /// </summary>
    public sealed partial class MainPage : Page
    {
        private MainPageViewModel viewModel = new MainPageViewModel();

        public MainPage()
        {
            this.InitializeComponent();

            DataContext = viewModel;
        }
    }
}
コメント