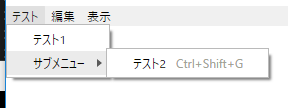
メニューを変更してみる。
アップしたソースからメインプロセスのソースを一部あげる。
const template:any = [
    {
        label:"テスト",
        submenu:[
            { label:"テスト1", click:()=> {
                dialog.showMessageBox({message:"テスト1クリック!"});
            }},
            {
                label:"サブメニュー",
                submenu:[
                    {
                        label:"テスト2",
                        click:()=>{
                            dialog.showMessageBox({message:"テスト2クリック!"});
                        },
                        accelerator:"CmdOrCtrl+Shift+G"
                    },
                ]
            }
        ]
    },
    {
        label: "編集",
        submenu: [
            {role: "undo", label:"元に戻す"},
            {role: "redo", label:"やり直し"},
            {type: "separator"},
            {role: "cut", label:"切り取り"},
            {role: "copy", label:"コピー"},
            {role: "paste", label:"貼り付け"},
            {role: "pasteandmatchstyle", label:"ペースしてスタイルを合わせる"},
            {role: "delete", label:"削除"},
            {role: "selectall", label:"すべて選択"}
        ]
    },

    <<省略>>
}

// ウィンドウの作成準備ができたときの処理を追加
app.on("ready", ()=>{
    // メニューを設定する
    const menu = Menu.buildFromTemplate(template)
    Menu.setApplicationMenu(menu)

    createWindow();
});
メニューのテンプレートを用意する。
配列でトップメニュー(と言うのかな?)のオブジェクトを用意する。これが、Windowsだとウインドウ上部に表示されるメニューになる。
それぞれのオブジェクト内にsubmenuでさらにメニューのオブジェクトを用意するとメニューをクリックした時に出てくるメニューになる。
メニューオブジェクトのプロパティやメソッドは、ここに詳しく書かれている。ここでは最低限必要そうなのを書いておく。
- label:メニューの表示名
- click:クリックした時に呼ばれるメソッド
- accelerator:ショートカットキーの定義
- submenu:サブメニュー
- type:メニューのタイプ。"separator"、"checkbox"とか。
- role:メニューの動作を定義。標準的なメニュー項目と動作が用意されているのでそれを指定する。どんなのがあるかは、ここに書いてある。clickメソッドが定義されている場合は無視される。
appのreadyイベントでMenu.buildFromTemplateを使ってテンプレートからメニューを作って、Menu.setApplicationMenuでメニューを設定する。
ポップアップメニュー
レンダラープロセスでメニューを用意しておいて、contextmenuイベントで表示する。レンダラープロセスのソースを次に示しておく。
import * as React from "react";
import {remote} from "electron";
import * as fs from "fs";
import * as electron from "electron";

const dialog = remote.dialog;
const Menu = remote.Menu;
const MenuItem = remote.MenuItem;

interface AppState {
    text?:string;
}

export class App extends React.Component<{}, AppState>  {
    private contextMenu:electron.Menu;

    constructor(props:any) {
        super(props);
        this.state = {
            text:""
        };

        // コンテキストメニューの準備(1)
        this.contextMenu = new Menu();
        this.contextMenu.append(new MenuItem({label:"テスト1", click:()=>{dialog.showMessageBox({message:"コンテキストメニュー:テスト1クリック"})}}));
        this.contextMenu.append(new MenuItem({label:"テスト2", click:()=>{dialog.showMessageBox({message:"コンテキストメニュー:テスト2クリック"})}}));

        this.onContextMenu = this.onContextMenu.bind(this);
    }

    render() {
        return <div>
                <span>Hello World</span>
            </div>;
    }

    onContextMenu(e:PointerEvent) {
        e.preventDefault();
        // ポップアップメニューを出す(2)
        ///// ↓ Electron 2.0.0でインターフェースが変わった。
        this.contextMenu.popup({window:remote.getCurrentWindow()});
    }

    componentDidMount() {
        document.addEventListener("contextmenu", this.onContextMenu);
    }

    componentWillUnmount() {
        document.removeEventListener("contextmenu", this.onContextMenu);
    }
}
ソースの(1)の部分でポップアップメニューを用意して、(2)の部分でポップアップメニューを表示している。
![[商品価格に関しましては、リンクが作成された時点と現時点で情報が変更されている場合がございます。]](https://hbb.afl.rakuten.co.jp/hgb/156c7677.231241a6.156c7678.18a749f7/?me_id=1278256&item_id=16287933&m=https%3A%2F%2Fthumbnail.image.rakuten.co.jp%2F%400_mall%2Frakutenkobo-ebooks%2Fcabinet%2F3598%2F2000005043598.jpg%3F_ex%3D80x80&pc=https%3A%2F%2Fthumbnail.image.rakuten.co.jp%2F%400_mall%2Frakutenkobo-ebooks%2Fcabinet%2F3598%2F2000005043598.jpg%3F_ex%3D128x128&s=128x128&t=picttext "[商品価格に関しましては、リンクが作成された時点と現時点で情報が変更されている場合がございます。]") Electronではじめるアプリ開発 〜JavaScript/HTML/CSSでデスクトップアプリを作ろう【電子書籍】[ 野口将人 ] |

コメント